Why compost?
Page Contents
Composting keeps things out of landfills and puts them to great use. When you include your children in the process they learn good life skills. They get a lesson in not being wasteful by repurposing what could have been just trash into something beneficial for your garden. Like so many things in life, you could also use this lesson in composting to delve deeper into the whys and hows. How exactly do worms break down the plants and fruits? What are the kind of nutrients that are put back into the soil by composting?

What is composting?
Composting is taking organic waste (plants and food scraps from your own kitchen) and allowing it to decompose in a pile to create a nutrient rich material that can be used in your garden. Composting helps to improve the nutrition of you soil and soil structure.
How does composting work?
Organic matter is decomposed by visible creatures such as worms, beetles, spiders and slugs. Millions of microscopic organisms and bacteria are also very important in this process.
What influences how quickly or slowly the composting process will take?
- Cold Weather – This will drastically slow down and cease further breakdown once temperatures start to dip.
- Hot Weather– Warmth helps to accelerate the decomposition process.
- Air Circulation – Proper air circulation is necessary for the survival of the organisms working hard at decomposing your organic wastes.
- Wet Weather – Moisture is important is the decomposition process. A good balance is still important though. Excessive moisture from heavy rain can lower the temperature. Too much water can also prevent air from properly circulating and lead to bacteria dying.
- Dry Weather – Check your compost regularly during dry weather to see if it needs water added. Too dry of a compost pile can lead to bacteria dying and little creatures leaving for more favorable conditions elsewhere.
When will my compost be ready to use?
When the compost is brown, crumbly, and without any obnoxious smells. It should be slightly warm to cool and should not have any identifiable wastes still visible. This may take a few months – It is going to vary depending on the above conditions that accelerate or decelerate the decomposition process.
Is it smelly?
It should not give off a noticeable smell as long as you are only adding proper items to compost.
What can I compost?
Around the House
- Vegetables and fruits (Careful not to add too much citrus, tomatoes, garlic and onion.)
- Coffee grounds and tea bags (filters and tea bag itself are all compostable.)
- Eggshells (only the shell)
- Hair
- Wood ash
- Wool Fabric Scraps (No synthetic fibers.)
- Egg boxes (Non plastic type)
Garden Wastes
- Grass clippings (Do not compost if recently treated with weedkiller though)
- Weeds (Annual and biennial weeds only. Do not use perennial weeds in your compost heap. (Do not use if they have gone to seed though)
- Leaves
- Shrub prunings
- Old potted plants
- Small branches
What should I not compost?
- Weeds that have went to seed, or perennial weeds.
- Meats and Fish
- Dog or Cat waste (Guinea pig and rabbit droppings and bedding are ok though since they are vegetarians)
- Charcoal Ash
- Dairy Products
- Fats and Oils
- Plants treated with pesticides
- Wood treated with preservatives
- Diseased plants
Getting Started Composting
Getting started can cost you nothing if you already use things you have around your home. There are various barrels and bins that you can purchase if you would like.
In the house compost container
You will need a container to collect your scraps in your home. We just repurpose empty plastic containers as our collection bin in the house. I particularly like using this big empty cheeseball container since it fits nicely in the cabinet under our kitchen sink. Use whatever works best for your situation. If you don’t have a cabinet or pantry handy to hide it in you may want to chose something taller and less wide to put on your kitchen counter. Just make sure it is easy to access wherever you place it.
Want something a little prettier?
a.) Bedazzle it up! Or,
b.) Buy a cute store bought option. These tend to come with carbon filters to help block out smells – but honestly ours never really has a bad smell when it is cracked open. Maybe it is because I try to take it out before it gets too “juicy” in there, so a couple times a week.

![]()

![]()

![]()
Outdoor compost bin
Once your indoor bin is full or it has been a few days take it outside to your compost bin. You will want to have your bin on an area with good drainage and weeds removed from underneath. We layed down a couple layers of cardboard to keep the weeds from growing up into an open bottomed compost container. Also take note of sunlight. If you are in an area where it tends to be really hot and you have your compost bin out in the sunniest part of you yard you will need to keep an eye on it to prevent it from drying out all the time.
D.I.Y. Wooden Bin
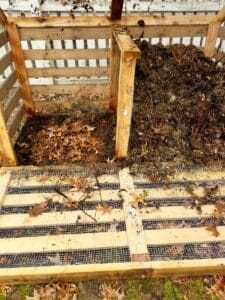
We made our bin out of wood and placed it in our back yard. My husband made a hinge on the front that comes down so I can easily get to the composted material or composting material to give it a stir. Ours only has two compartments but three compartments are ideal so that you have a compartment for fresh material, material that is midway through the decomposition process, and a bin that has compost ready to use. You want to make sure you leave room for air to circulate through the compost container. We added chicken wire so we could space our wooden boards out more without having to worry about our compost spilling out or bigger creatures trying to get into it. We made a top that hinges as well to keep critters out, but you don’t really need to do this, as long as you are not adding meats, fish, etc, because these things will attract unwanted visitors. You will want to make sure your wood is not treated with any toxic chemicals otherwise these will leach into your compost and thus into your garden. I can add our plans to this page if anyone is interested in how we made ours, just leave me a comment below.
Want something even easier?
Buy a bin: You should be able to easily find a prefabricated bin from Home Depot, Amazon, or better yet your local garden nursery.

![]()
Compost Tumbler: These are the ultimate easy to use bins. Just put your organic matter in and easily roll it 2-3x a week. They take all the guess work out and make it super simple to keep your compost mixed and progressing quickly. You can complete the composting process in as little as one month with one of these bad boys. This particular model has some really good reviews and is $20.00 off right now on Amazon.

Want easy, but also don’t want to spend much?
Get creative and reuse things you already have on hand or materials that cost very minimal.
For example, use an old plastic storage tote with holes drilled in to give plenty of room for air circulation and drainage. Plastics type 2 and 4 are the best as far as safety goes in composting.
Rolled wooden or plastic fencing – These options do not seem as good long term, but if you just want to play around a little and see if you are into composting it is an affordable idea.

Wire bins made from 4 (or more) posts pounded in the ground and then wrapped by chicken wire or some type of wire netting. Some type of covering (tarp) will be useful to keep it moist.
Alternatives to compost bins
You don’t have to have your compost in a tidy bin. You can merely have a compost heap, or make compost holes or trenches. For our our raised beds we have used lasagna gardening where you do brown and green layers and then can top off with garden soil if wanting to plant that season. If you do this just make sure your composting foods are far enough down for the critters to leave undisturbed otherwise they will dig up your growing plants to get that little treat hidden underground. Also be careful of potatoes and such in this situation unless you don’t mind having some unexpected plants start up in your garden bed. Not that I am speaking from experience…I get a little sloppy with my lasagna layered gardens and just start throwing stuff in there and see what happens.
What to do?
- Compost piles should be mixed up every 3-4 days if using a tumbler and about 1x a week if using a bin/pile type method. I’m rather bad about this one too – If I get to it one week cool, if not then I’ll get it some other time. It will work faster if you turn it at the proper temperature but if you are not in a hurry then it is one less thing to worry about. I also don’t do it in the winter.
- You can insulate it in the winter to keep things working longer. I don’t, I just let it kind of stop and start back up again in the spring. The picture above shows my leaf and grass clipping layers from last fall, they haven’t done much over the winter but they will get started again here now that it is warming up.
- You want to have a fairly even mix of brown and green materials in your compost pile.
- Green Materials: such as grass clippings, fruit and vegetable scraps, and coffee grounds are nitrogen rich.
- Brown Materials: such as autumn leaves, cardboard, and sawdust are carbon rich.
Summing up
Don’t let composting overwhelm you! Here are the major points:
- Know what is ok and not ok to add.
- Give it a mix 1x week if possible.
- Try to have a semi thoughtful mix of green and brown organic matter.
- If it is looking a little dry add some water.
If you are a parent reading this you already have enough to do every day, just try to include your kids so they gain an appreciation for the earth and the food that grows from the earth to nourish their growing bodies. It teaches them not to be wasteful, and it is kind of circle of lifey…if that is a term. There will be some trial and error, and that is a good lesson for your kids as well. If something isn’t working the way it should, don’t give up, try to figure out the problem and fix it. Anyway, have fun with it, don’t stress, and when it is ready it’s ready. Have fun!
*This page contains affiliate links. All opinions are completely my own but if you follow one of my handy links I earn a small commission at no extra cost to you. As a participant in the Amazon Services LLC Associates Program I may earn a commission through their affiliate advertising program designed to provide a means for sites to earn advertising fees by advertising and linking to Amazon.com Thanks for your support!
More:
Science Experiment: Amazing Seeds
Want to Stay in the Loop?
Sign up for the Sunshine and Clover 123 newsletter for a 30% off coupon code, and stay updated on the latest products and happenings! Have fun learning!